Tuesday, September 23, 2014

MotovationUSA's Triumph Speed Triple

Motovation Custom Triumph Speed Triple 1050The Triumph Speed Triple. A quintessential three cylinder engine motorcycle that truly stirs the soul. A perfect balance between the thump and torque of a 2 cylinder and the manic scream of a 4.

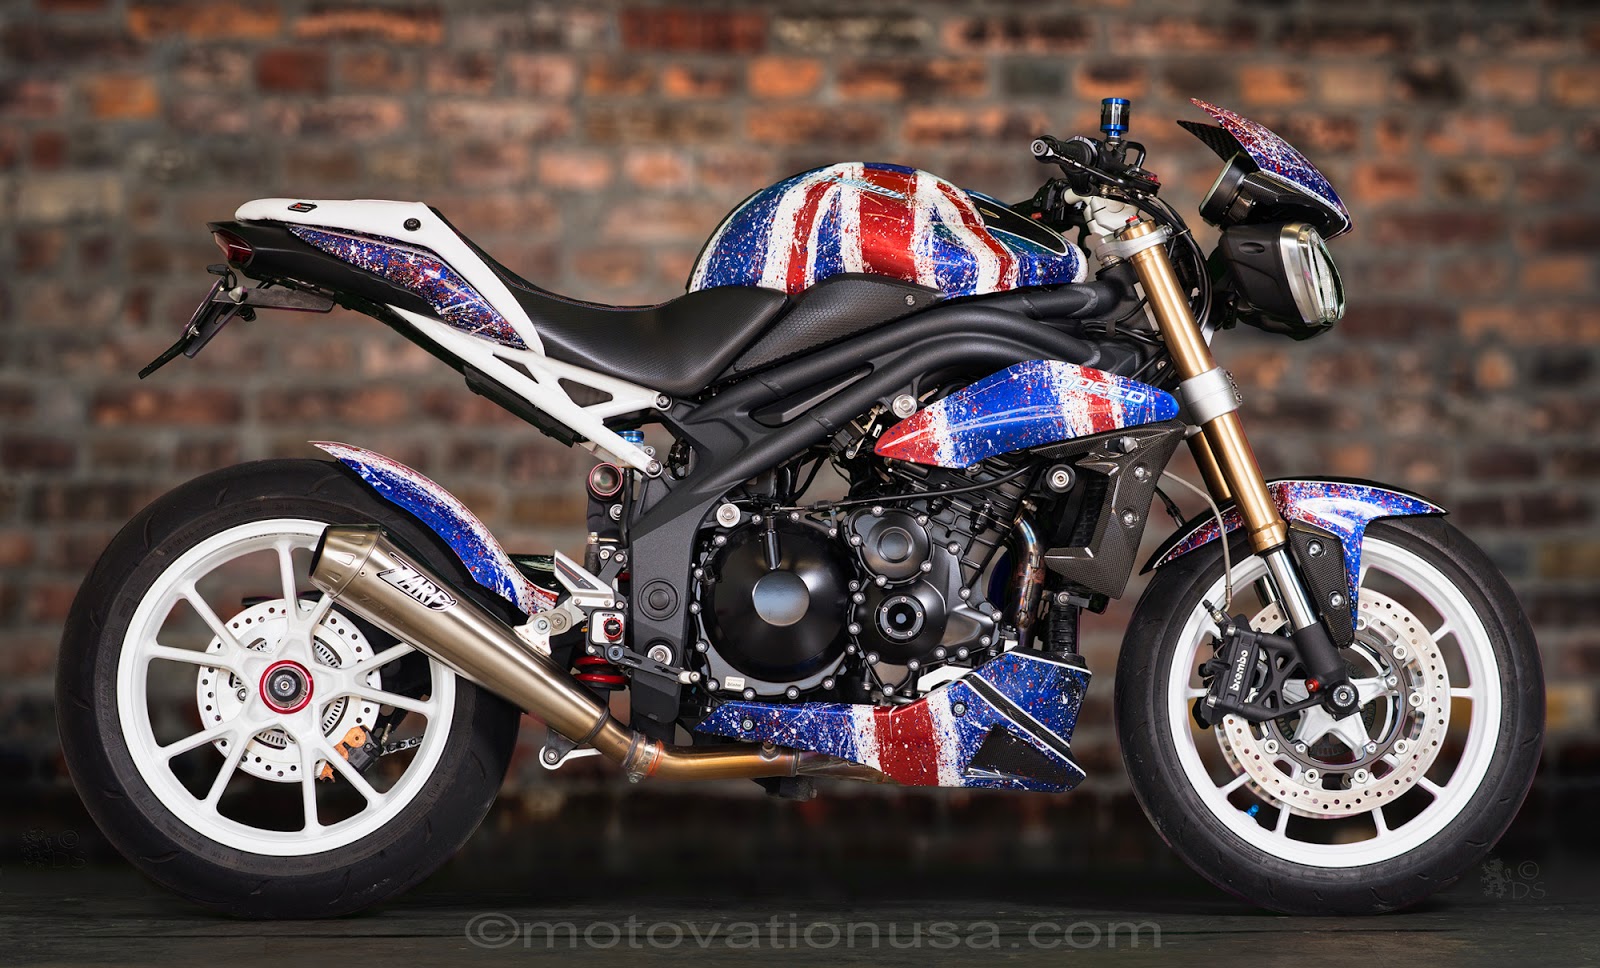
When we first looked at these bikes, we thought that there was not much we could do to it. It seemed somehow almost perfect. Like many of the bikes that we chose to customize, it was more about preserving the essential qualities that made this motorcycle what it is. Its soul and character. With that in mind we chose the 2013 Triumph 1050 Speed Triple. Triumph's latest variant of their enduring 3 cylinder motorcycles.

We've seen many custom versions of this bike, including some very radical rebuilds with creativity that blew our mind. We've never claimed to be custom bike builders. We're actually more of a 'makeover artist' or 'customizer' of the motorcycles we love. We've always endeavored to show off what can be done with the simple yet tasteful use of bolt-on top-shelf accessories and some custom paint.  So began the journey for us.

With the support of the companies we currently represent, we utilized accessories from Rizoma, Zard Exhaust Systems, SAMCO Hoses, Ilmberger Carbon, LuimotoBazzaz Engine Management, Techspec Tank Protectors, Krystal Hess from Ricochet Customs for her powder coating skills and of course Brandon 'Scaz' at House of Air in Austin for his incredibly skilled custom paint. Photos by Doug Saylor.

Paint Concept:
Motovation Triumph Speed Triple Custom Paint
We've seen many versions of the Union Jack. We beat ourselves on the head for weeks trying to figure out how to incorporate this element into a one-of-a-kind paint scheme that would work on this bike. After extensive research we happened upon a 'grunge' variation of the Union Jack Flag on the internet. After many hours of Photoshop mock ups we discussed our ideas at length with Brandon (Scaz) Scaramazzo at House Of Air in Austin. We challenged him with the task of making it 'loud' yet imbued with subtle detail that not only riders could appreciate but his peers would also admire. He was up to the challenge and so the work began.  It was indeed a labor of love and the results from Brandon were outstanding! All the primary colors or red and blue were incredibly layered with iridescent shades of metallic and pearl. Splatters and splashes were 'grungy' yet smooth and artistic. Lines followed lines and flowed smoothly from panel to panel so the overall effect was that of one canvas split over multiple fairing panels. Everything exhibited such depth of colors that the layers appeared to float in their element. We were seriously pleased!

Billet Parts:
Rizoma clearly makes some of the nicest accessories for the Triumph Speed Triple and it was really a no brainer for us to use as many of their parts as possible for this build. Their anodized colors are pure and complement the overall look of the bike.

Seat:
We've always used Luimoto for all our projects because they have always been able to come up with good quality products with a design aesthetic that we really appreciate. So this project is no different. Our very good friends at Luimoto designed this über cool Café Line seat cover for us. Easy to install and really adds a nice touch. Alcantara Center with red and white accent stitching really adds a nice touch and the white passenger seat panel sets off the rear subframe extremely well.

Performance:
We chose the Zard Full System because of their reputation for quality and performance and it had the 'uncommon' look that we desired. Fit and finish was perfect.  Many thanks to Eurocorsa for their assistance with this system. A full system would not be complete without fueling improvements. We tried, it made stupendous power but the backfiring on deceleration drove us nuts.  A Bazzaz ZFi with AFM (Air Fuel Mapping). Simple and easy install because the units come with their own harnesses and great instructions. Plug a laptop into the ZFi, set the unit to record, ride as you would normally ride, connect the laptop again and the software will recommend the changes needed to get the best performance, select 'yes' to apply the changes to the ZFi and you're done! Voila! No more backfire with smooth power throughout the rpm range.
Samco hoses were chosen to allow the bike's cooling system to work much more efficiently. They come in a wide variety of colors and look really cool. Literally!

Carbon Fiber:
Theresa Ponder
What's a pretty bike without a pretty face?
Ilmberger is the world's leading supplier of quality carbon for today's modern motorcycles. They are one of the very, very few manufacturers that we have come to trust for their quality, fit and finish. They are also the only company that had the full complement of body panels that we needed for this project. We wanted all the carbon panels to come from one manufacturer because even though most of them will be painted over, we still wanted the weaves to match. Did you say painting over carbon? Sacrilege? Maybe so to some but we have never been a fan of a full carbon look. We like paint because we like colors. So we design our art to flow with the contour lines of the panels yet still expose carbon at the right places. It's just our style I guess.

Wheels and frames:
We really wanted white wheels and a white rear subframe so we turned to the charming(and beautiful) Krystal from Ricochet customs for some of her powder coating magic. Krystal was easy to work with, always prompt and does flawless work. This project was no exception. 

Protection:
Of course none of our bikes would be complete without our Motovation products.  So for this bike we've added Motovation fork and rear axle sliders.

Conclusion:
This Speed Triple project was indeed a joy for us to do and it is one that we are particularly proud of. She not only looks good but runs perfect too! Like our other builds, this one is really best appreciated by seeing it in person. The more you walk around it and look at it, the more you will see with each pass. Such are the details that no photograph can really do justice to. We hope that you will enjoy our Triumph Speed Triple as much as we have enjoyed dressing her up.

For a full list of products that we have installed on this bike and profile please click here.


Motovation Triumph Speed Triple 1050 Profile


2013 Triumph Speed Triple 1050

Photography:
The talented Mr. Douglas Saylor

Custom Paint:
House Of Air - Brandon Scarammazo

Powder Coating:
Wheels and Subframe- Krystal Hess of Ricochet Customs

Exhaust:
Triumph Speed Triple (07-10) Full System Exhaust by Zard (ZTPH038TSR)

Fuel and Engine Management:
Bazzaz Z-Fi Fuel Control with AFM (BAZZFI)


Parts and Accessories:

Rizoma:
  • Rizoma EVO Rearsets Speed Triple 2011+ (PE456B)
  • Rizoma License Plate Kit for Speed Triple (PT654B)
  • Rizoma Folding FEEL Levers (RIZLV001)
  • Rizoma Swingarm Spools for Triumph(SC020)
  • Rizoma Billet Aluminum Gas Cap (TF042)
  • Rizoma B-Pro Frame Sliders Street Triple (PM515A)
  • Rizoma Universal Lux Billet Grips (GR213)
  • Rizoma Universal Next Fluid Tanks Size 27 (Front Brake) (CT127)
  • Rizoma Fluid Reservoir Bracket-M6 (Front Brake Reservoir) (CT451B)
  • Rizoma Universal Next Fluid Tanks Size 15 (Rear Brake) (CT115)
  • Rizoma Conical Handle Bars 29-22mm (MA005/MA008/MA010)
  • Rizoma Universal Engine Oil Filler Locking Cap (RIZTP000)
  • Rizoma Action Turn Signals (FR028)
  • Rizoma Turn Signal Cable Connector Kit (EE0073)
  • Rizoma Spy R Bar End Mirror (Left Side) (BS185)
  • Rizoma proguard Lever Protection System (Brake Side) (LP010)
  • Rizoma Adapters for Bar End mirrors and Proguard (LP01x)
  • Rizoma Crankcase Slider Speed Triple 05+ (TRIZHH052)
  • Rizoma Engine Slider Speed Triple (2008+) (PM530A)


Samco:
Triumph Speed Triple (2011-2014) Samco Hose Kit (TRI-10)

Spiegler:
Spiegler PREMIUM Stainless Brake Line Kit (SPIEGPREMIUM)

Luimoto:
Triumph Speed Triple Cafe Line Seat Cover (LUITRISPTRIP)

Techspec:
TechSpec Triumph Speed Triple Snake Skin Pattern (62-3501-SS) 

Motovation:

  • Triumph Speed Triple Fork Sliders (2011+) (FFSTR04)
  • Triumph Speed Triple Axle Sliders (2011+) (RFSTR04)


Bridgeport:
Drop Forged Tubeless Valve Stems (pair) (BPVS001)

Photos by Doug Saylor

©2014 motovationusa.com

Wednesday, July 16, 2014

First official photo of the custom built Triumph Speed Triple by MotovationUSA.com

The first photoshoot is complete!  Here is a teaser photo of the Triumph Speed Triple.  Lost of hard work and help went into this custom build.  The bike started as an acid green stock bike.  Thanks for the support from Rizoma, House Of Air paint, Ricochet Customs powder coating, Zard exhaust, Luimoto and more!

More photos are available on our Facebook page!

Stay tuned for more info and build specs.

Photos by Doug Saylor

Wednesday, July 9, 2014

LUIMOTO Custom Seat Cover Installed on the MotovationUSA Yamaha FZ-09

LUIMOTO Custom Seat Cover Installed on the MotovationUSA Yamaha FZ-09

Luimoto is the authentic designer of motorcycle seat covers. You can find a complete list of seat covers to enhance the look of your motorcycle HERE. Luimoto designs and manufactures all of their seat covers in-house, utilizing computer aided design (CAD) as well as a computer controlled CNC cutter to produce all of their products. This ensures the highest and most consistent quality available.

Here at MotovationUSA, we are no stranger to the Luimoto seat covers, and have used them on ALL of our recent project bikes.  We see them as a very simple to install, custom "paint job" for the normal boring stock seat.

Installation is very simple due to the perfect cut and finish of the seat cover.  Simply stretch it over your stock seat and then staple the undersides.  We use a pneumatic staple gun for ease of install, but I dont see why your typical hand pump staple gun wouldn't work with the right size upholstery staples.

Our Yamaha FZ-09 project has much more to go, but for now, this is a welcomed update and really looks great on the bike.

More details, photos, color options and pricing information can be found HERE.


HERE are some YouTube videos showing how simple these seat covers are to install.

Wednesday, June 25, 2014

HOW TO: Install Rizoma Frame Sliders on Yamaha FZ-09

HOW TO: Install Rizoma Frame Sliders on Yamaha FZ-09

 Here at Motovation we have learned a thing or two about properly protecting your motorcycle.  Sportbike protection is the cheapest form of insurance you can add to your bike.  The time to add frame, fork and axle sliders is BEFORE an incident....not after!

For this project bike, we are installing the Rizoma Engine Guards.  These frame guards are a very simple install on your FZ-09/MT-09, and you will be back on the road in no time!

Rizoma Part # PM212A

RIGHT HAND SIDE INSTALL
1. Locate the bolt you will be removing on the RIGHT side of the bike. The bolt is right near the bikes radiator.  Remove this bolt and washer and set it aside. (You will not be re-using this bolt)
2. Take 1 of the slider pucks from the Rizoma package. (They are both the same size) THE BOLTS AND SPACERS ARE SPECIFIC TO THE SIDES OF THE BIKE.  For the RIGHT side you will be using the shorter of the 2 bolts, and the shorter of the 2 spacers.
3. Place the bolt through the slider puck and then through the short black spacer.  (We recommend adding blue loctite to the bolt).  Gently thread this bolt into the same hole that you removed the stock bolt from.  Refer to the instructions for proper torque specs. (Rizoma recommends 30-33 ft/lbs)
4. You may need to hand tighten the actual black portion of the Rizoma slider puck to ensure that the puck is snugged up tightly.


LEFT HAND SIDE INSTALL
1. Locate the bolt you will be removing on the LEFT side of the bike. The bolt is up front near the bikes radiator.  Remove this bolt and washer and set it aside. (You will not be re-using this bolt)
2. Take 1 of the slider pucks from the Rizoma package. (They are both the same size) THE BOLTS AND SPACERS ARE SPECIFIC TO THE SIDES OF THE BIKE.  For the LEFT side you will be using the longer of the 2 bolts, and the longer of the 2 spacers.
3. Place the bolt through the slider puck and then through the long black spacer.  (We recommend adding blue loctite to the bolt).  Gently thread this bolt into the same hole that you removed the stock bolt from.  Refer to the instructions for proper torque specs. (Rizoma recommends 30-33 ft/lbs)
4. You may need to hand tighten the actual black portion of the Rizoma slider puck to ensure that the puck is snugged up tightly.


You can see from the front profile that the Rizoma engine sliders stick out the perfect amount and will add very valuable protection, without being an eye sore.


Before and After Install Photo


For more information, photos, details, and pricing information visit our MotovationUSA.com website

HOW TO: Install the Rizoma headlight fairing / windscreen for the Yamaha FZ-09


HOW TO: Install the Rizoma headlight fairing / windscreen for the Yamaha FZ-09


Not sure how many of you have seen this screen from Rizoma. I just installed ours and it only took 10 minutes. What an improvement it was for the front end both aesthetically and for added wind blast protection.  Happy to report that this is the first of many Rizoma parts we will be installing on this custom FZ09 project!


1. Remove the front 4 OEM bolts on the front "plate" that the turn signals are mounted to. (set them aside, you will reuse them.)
2. install the supplied FZ-09 bracket using the bolts you just removed - with a dab of blue loctite. (pay attention to make sure you dont install them backwards, otherwise the screen wont line up) ***Note: your kit will also include brackets for the FZ-07, you will NOT be using those***
3. Once the left and right bracket are installed, press in the 4 rubber windscreen bolt receivers into the 4 open holes of the brackets. Slightly wetting them may help them slid into place.
4. Line up the screen and install it using the 4 supplied black bolts and their plastic washers - again, blue loctite is recommended. ***Do not over tighten these, you will see the rubber bolt receivers start to "mushroom out" in order to hold the screen in place.
5. Step back and say "damn that screen looks good!"

FYI, these instructions will be the same if you decide to go with the polycarbonate or the aluminum screen. After installing this piece, I had to wonder why Yamaha left that front plate with nothing installed on it. It just looks so much better with the headlight fairing installed IMO.

Rizoma Part #

Tuesday, June 24, 2014

Motovation Ducati Hypermotard 821 SP - UPDATE - triple clamps and sprocket carrier

The Hyper 821SP project is really coming together quite nice.  The CNC Racing sprocket carrier and bolts are now installed.  It's amazing what a touch of RED can do to your carbon fiber wheels!


The painter is wrapping things up on the amazing Italian American paint scheme, and we couldn't be happier.

One thing that all naked bikes benefit from is a great set of handlebars and risers.  As always, we took things a step further by adding the CNC Racing triple clamps.  The beefier clamps go VERY well with the all black Marzocchi forks that come standard on the SP model.


Just a few finishing touches remain before we unveil this Ducati project.